 902-521-7592
ATV Trailers, RV Wheel Chocks, ATV & RV Accessories
Designed & built in Nova Scotia, Canada
RV Wheel Chocks
The Ultimate Wheel Chock finally solves the problem of a rocking RV.
When installed on both wheels of the same axle, it will act as an anti-rocking mechanism. It is like activating an emergency brake on the RV.
Easy to install, takes one minute to set it up for your RV wheel, and two minutes to install. Once it is installed you can forget about it until you are ready to pack up and leave the campground. Works great for seasonal camping as well.
-
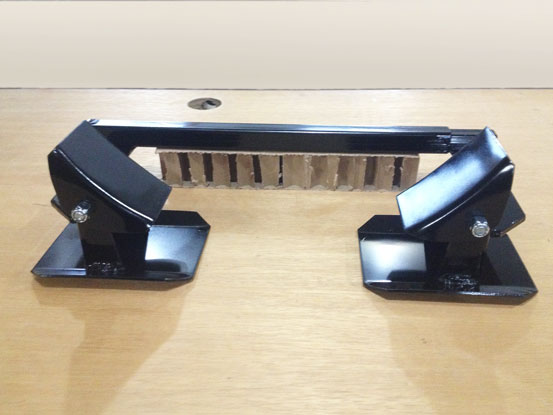
The Ultimate RV Wheel Chock -
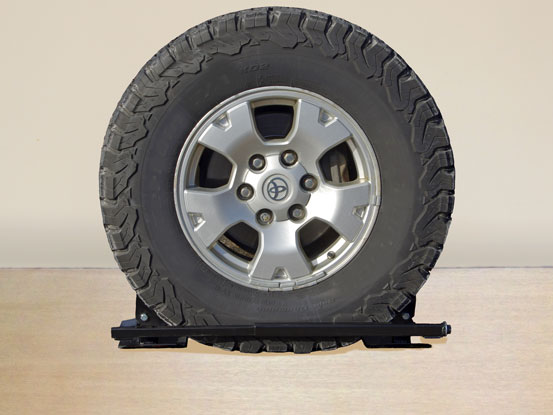
RV Wheel Chock installed on tire -
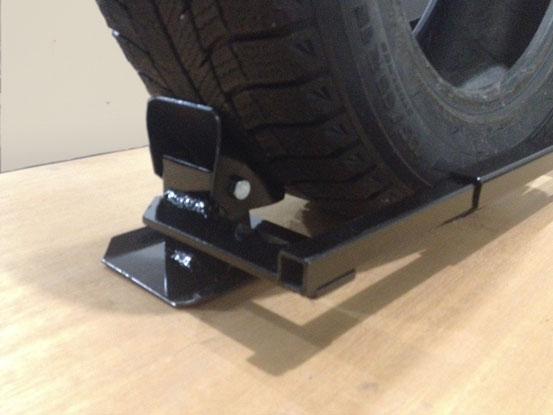
Pad rotates to lay flat against the tire -
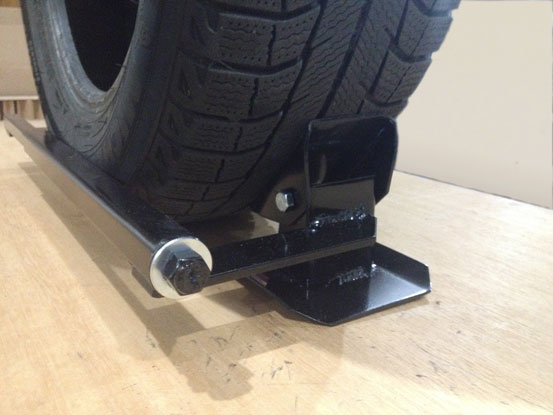
Adjustment nut to torque the clamp
The Ultimate RV Wheel Chock
Demonstration by Allan Hubley
How the Ultimate Wheel Chock Works
This Wheel Chock is designed to wedge the front and back, and squeeze against the wheel to hold it firmly in place.
The unit is a clamp, sitting on the ground around the wheel and with a ¾" socket, torque the two halves together against the wheel.
It has two floating pads that are curved to give maximum contact against the tire tread.
Features:
- Pivoting contact pads are concave to give maximum tire contact.
- Will work on any size tire
- The bases are flat to give the maximum ground contact.
- Will work great on planks if used for levelling. Once installed, doesn’t require adjustment.
Specifications:
- Weight: 10 lb
- Width: 8" overall
- Length: 18" fully collapsed
- Pad: 4" high by 3" wide
- Material: 1/8" steel
- Minimum tire size: 22" OD
- Maximum tire size: 34" OD
- Color: Black
- Adjustment nut: ¾"
Price:
$120 / pair + HST *
$70 each + HST *
* Pricing subject to change based on material costs.
Does your RV step flex when you step on it? My new RV Step Buddy ensures you a firm, steady step up into your RV. MORE ►
Instructions for use:
- If chocking a tandem trailer, select a tire where the nut will be to the front or back of the two tires. (You will not want the nut between the tires, especially if the tires are close together)
- Slide the two halves of the ULTIMATE WHEEL CHOCK apart enough to enable positioning around the wheel you wish to chock.
- Slide the assembly all the way in against the sidewall of the tire
- Slide both halves together against the tread of the tire making sure the pads are flat against the tire
- With one hand holding the tubes against the tire and the bases flat on the ground, tighten the threaded rod until the pads are tight against the tire.
- For best results, install the second assembly on the opposite wheel of the same axle.
To place an order call Allan: 902-521-7592 or email: Allan Hubley, Outdoor Solutions
We can discuss your order, and make arrangements for delivery.
Terms: Cash, credit card, and e-transfer accepted. No refunds on custom work.